Pillar Tips for Better Sleep

Who wants to take a guess at how many hours the average person spends sleeping over the course of their lives? Alright, enough suspense -  the answer is nearly 230,000 hours

It’s no secret that sleep benefits our physical and cognitive performance. Check out our blog on Sleep Data for more benefits gained by sleeping better.

With all of the time spent and all of the benefits to be gained, are you truly getting the most from your sleep? Read below for tips from our other pillars of health, Mindset, Nutrition and Movement, to see how they can positively impact your Recovery through sleep.

Mindset Tips for Quality Sleep:

  • Set a consistent time to go to bed, and stick to it. That means on weekends too!

  • Begin removing screens and dimming lights a few hours before you plan to go to bed.

  • Practice this breathing technique right before bed to relax your mind and body: 

    • 6 count inhale (through your nose)

    • 3 count hold

    • 6 count exhale (through your mouth)

    • 3 count hold…….zZzZz (I’m feeling sleepy already).

Nutrition Tips for Quality Sleep:

  • Avoid eating too close to bedtime. Schedule a consistent time for your last meal of the day, and make sure it’s a few hours prior to the time you plan to go to sleep.

  • Avoid or limit sugary, caffeinated or alcoholic beverages late at night.

  • Make sure you are adequately hydrated before going to bed.

Movements Tips for Quality Sleep:

  • Aim to complete any strenuous exercises early in the day as opposed to late at night.

  • Work relaxing Yoga, stretching or foam rolling into your winding down routine.

Now the ball is in your court, my friend. Take one or two of the suggestions from above and implement them into your daily routine. Feel free to let us know how it goes through the red contact us button on the top of your screen.

Understanding Popular Recovery Modalities

Active recovery strategies are a hot topic these days. They are being shared all over social media as great ways to get better and faster results in the gym. There are even stand-alone businesses dedicated solely to recovery modalities, similar to a gym membership. It is awesome that recovery is becoming a staple puzzle piece in people's lives. Now, you just need to know what each is and which you need for you and your journey!

Today, we will cover four primary therapies:

  1. Cryotherapy

  2. Hyperbaric Oxygen Therapy

  3. Compression Therapy

  4. Infrared Sauna Therapy

unsplash-image-SsqTTTNtsEs.jpg

Cryotherapy:

“Cryotherapy, or cryogenic therapy, is any form of treatment using freezing or near-freezing temperatures. Small-scale cryotherapy can include ice bath immersion or cryotherapy facials. Advocates for cryotherapy cite a variety of health benefits, many relying on claims of reduced inflammation. Scientific studies that demonstrate actual effectiveness are sparse as testing is still in the early stages and almost all benefits are currently theoretical. Pain relief and muscle recovery are the primary reasons people try cryotherapy, since WBC could potentially be a quicker solution to problems solved by ice packs or ice baths.” – Integris

Although studies are still coming in on the efficacy of multiple treatments for cryotherapy, it seems that one big takeaway currently is similar to the application of ice, in that it helps to reduce pain in the joints and muscles.

Hyperbaric Oxygen Therapy:

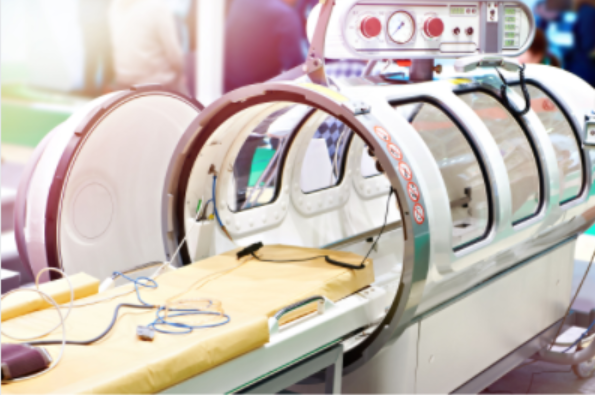
“Hyperbaric oxygen therapy involves breathing pure oxygen in a pressurized environment. In a hyperbaric oxygen therapy chamber, the air pressure is increased two to three times higher than normal air pressure. Under these conditions, your lungs can gather much more oxygen than would be possible breathing pure oxygen at normal air pressure. When your blood carries this extra oxygen throughout your body, this helps fight bacteria and stimulate the release of substances called growth factors and stem cells, which promote healing.” – Mayo Clinic

hyperbaric.PNG

Studies have shown terrific results utilizing hyperbaric oxygen therapy, which is why it is used in clinical and professional athletic settings due to its efficacy. The problem for the modern-day person, is that they are rare and hard to come by. Finding a therapy clinic near you will likely be your best route for utilizing this type of therapy.

Compression Therapy:

“Compression therapy uses controlled pressure to increase blood flow in your legs and improve blood flow to the heart. At the same time, it supports your veins and decreases swelling. Pneumatic compression devices use an air pump and inflatable garment to create intermittent compression for your legs or other body parts. Compression stockings and garments for athletes have become increasingly popular. Compression therapy is thought to improve performance, reduce soreness after exercise, and reduce the risk of blood clots.” – HealthLine

Compression therapy stems from the R.I.C.E. method created by an athletic trainer. C= compression in that acronym. Compression of all sorts have been used for decades to increase blood flow to the localized compressed area, which we know will deliver oxygen and nutrient rich blood to help with the recovery and healing process.

infrared.PNG

Infrared Sauna:

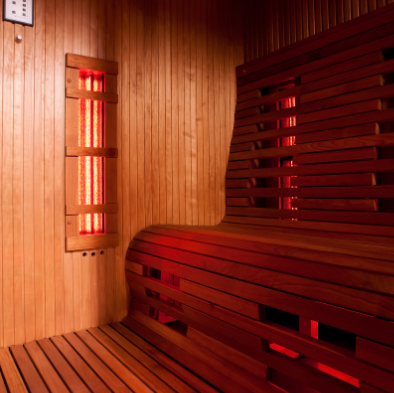
“An infrared sauna is a type of sauna that uses light to create heat. This type of sauna is sometimes called a far-infrared sauna — "far" describes where the infrared waves fall on the light spectrum. A traditional sauna uses heat to warm the air, which in turn warms your body. An infrared sauna heats your body directly without warming the air around you. Several studies have looked at using infrared saunas in the treatment of chronic health problems, such as high blood pressure, congestive heart failure, dementia and Alzheimer's disease, headache, type 2 diabetes and rheumatoid arthritis, and found some evidence of benefit.” – Mayo Clinic

Although the jury is still out on some of the clinical effects sauna may have on the body, one thing we do know for certain is that it increases blood flow dramatically due to the light heating up your core temperature. Also, due to the extreme levels of heat, your body activates heat-shock proteins which are terrific for brain health.

As a friendly reminder, always consult with your physician, or other healthcare professionals, before trying new exercise-recovery modalities.

Sleep Data On Daily Performance

Sleep is rapidly becoming the talk of the town in regards to getting the most out of your proactive health approaches. This has to do with new understanding of how much sleep plays a role in your physical and mental performance, regulating your hormones, keeping your immune system strong and preserving your brain’s health for the long term.

There are several sleep tracking devices that you can use, but here are a few that are popular:

  1. Whoop Strap 

  2. Oura Ring

  3. Apple Watch

  4. Sleep Time App

We pulled some data from Whoop’s Strap to show the effectiveness of sleep data on your daily life.

Sleep data: Whoop Strap, after 4 months of use:

  1. Reduced RHR - Reduced resting heart rate by 4.4 BPM

  2. Increased HRV - Increased heart rate variability by 8 milliseconds (Heart rate variability measures the variation in time between each heartbeat. HRV plays an important role in letting you know how recovered you are after the previous sleep, which then in return, allows you to determine how intense you should work out that day).

  3. Better Sleep - Dedicated an additional 41 minutes to sleep per night

  4. Fewer Injuries - Experienced injuries 60% less often

  5. Less Booze - Consumed alcohol 79% less often before bed

  6. Smoother Travel - Minimized the symptoms of exhausting travel

Do you use a wearable fitness tracker? If yes, has it helped you to stay accountable with your movement and/or recovery? Comment below and let us know what areas of health and fitness you use it to monitor.

If you would like to set up an appointment to review your wearable tracker feedback with one of our fitness staff, please contact Coach Gavin.

Top 3 Protein Shakes For Workout Recovery

Protein shakes are nothing new to the fitness and nutrition industry. However, have you ever stopped to consider what you need out of a recovery shake after a tough workout? Have you ever made a shake at home, or only bought them pre-made from a smoothie or juice bar?  We are going to share some insight and provide you with some nutritional and flavor-packed recipes!

To start off, protein shake is an interesting term. Some people take the term more literally and view the shake as a liquid supplement for adding protein in their diets. Others view the term as a way to recover properly from a nutritional standpoint after a workout. Lastly, some view it as a synonymous term for a smoothie, which is a healthy liquid drink to consume, as an alternative to an unhealthy option (e.g., soda). So, the first thing you should do is figure out how you view protein shakes and then determine what you really want out of them.

From a fitness standpoint, we are going to view the term “protein shake” as a fast and easy way to get the proper macronutrients in after a workout in order for your muscles to heal and replenish glycogen stores that were depleted from the workout. Given that,  we want to add the proper amount of carbohydrates and protein in the shake - not just protein! That makes the phrase mean something completely different in your head now, huh? Don’t worry, we’ve all had that lightbulb moment ☺.

Macronutrient ratios differ based on a person’s size, duration of the exercise performed, and training goals, so it will be hard to give a one-size-fits-all breakdown. For the sake of guidance, a good rule of thumb is to get at least 20g of protein following a workout or physical activity. Your carbohydrate amounts will then depend on your training goals. The following are general protein to carbohydrate ratios you can follow, depending on your goal:

  1. Weight loss: 1:1 ratio (20g PRO : 20g CARB)

  2. Weight maintenance: 1:2 ratio (20g PRO : 40g CARB)

  3. Weight gain: 1:3-4 ratio (20g PRO : 60-80g CARB)

Now that you have a good understanding of what a protein shake is, or shall we now call it a “recovery shake”, you can utilize these recipes as a blueprint or template, to adjust and alter macronutrients to fit your goals! Bon appetit!

Strawberry Banana

Ingredients:

  • 1 cup of 2% milk

  • 6 ounces of Greek yogurt (plain or flavored)

  • 1 scoop of vanilla whey protein powder

  • 8 fresh or frozen whole strawberries

  • 1 whole banana

  • 1 teaspoon of honey

  • 1 handful of ice

Nutrition Information

  • Calories: 437.1

  • Fat: 6.5 g

  • Carbohydrates: 57.8 g

Protein: 36.9 g

unsplash-image-rwBJaJdesGg.jpg
unsplash-image-huyLlw27_8E.jpg

Mixed Berries

Ingredients

  • 1 cup of 2% milk

  • 6 ounces of Greek yogurt (plain or flavored)

  • 1 scoop of vanilla whey protein powder

  • 8 fresh or frozen whole strawberries

  • 1/2 cup of fresh or frozen blueberries

  • 1/2 cup of fresh or frozen raspberries

  • 1 teaspoon of honey

  • 1 handful of ice

Nutrition Information

  • Calories: 493.9

  • Fat: 6.8 g

  • Carbohydrates: 71.8 g

Protein: 37.8 g

unsplash-image-1uZ1d_Oyjbc.jpg

Chocolatey PB&J

Ingredients

  • 1 cup of 2% milk

  • 6 ounces of Greek yogurt (plain or flavored)

  • 2 tablespoons of peanut butter

  • 2 tablespoons of strawberry preserves

  • 1 whole banana

  • 1 scoop of chocolate whey protein powder

  • 1 teaspoon of honey

  • 1 handful of ice

Nutrition Information

  • Calories: 584.9

  • Fat: 18.1 g

  • Carbohydrates: 52 g

  • Sugar: 46.5 g

Protein: 40.8 g

What are you favorite recovery shake ingredient combinations? Share them in the comments below!

3 Stretches To Reset Your Posture At Your Desk

Posture, posture, posture! It’s a word we hear all the time if we find ourselves working behind a computer screen at a desk for a living. It’s a periodic reminder of the importance of our physical health. 

Unfortunately, our bodies were not designed for sitting continuous with perfect posture for 8-10 hours a day or longer. It’s natural and normal to start to slouch and “get comfortable.” That’s because maintaining an upright posture is WORK. Work means we are using our muscles, exerting energy and burning calories. The nifty thing about the human body is it will do whatever it can to preserve energy, and this is where slouching comes into play.

So, instead of giving up on your posture or feeling uncomfortable all day trying to be perfectly aligned, give yourself hourly breaks. Within these short breaks, try implementing these 3 stretches, that can be done in your chair or at your desk, to help reset your posture to a more vertical and natural position.

#1 - Seated, 90/90 Stretch

  • 40 seconds hold each side; perform 1-3 times per side

#2 - Seated, Bent Over Chest Stretch

  • 10 repetitions each side; perform 1-3 times per side

#3 - Seated, Bent Over Upper Back Stretch

  • 10 repetitions each side; perform 1-3 times per side

If you’re looking for more ways to reset your posture while you work, please check out Texins’ virtual group exercise schedule and join us for a live stretch break via Webex.

5 Tips to Help You Relax and Improve Your Bedtime Routine

#1 - Self-massage

The only thing more annoying than not being able to fall asleep due to not being able to get comfortable is having an overactive mind. Hopefully, all these tips will combat that one for you. However, let’s start with creating a relaxed body first. One starting approach to relieving a tight, achy, or uncomfortable body/muscles is self-massage. Nowadays, there are tons of tools for this such as: massage guns, foam rollers, lacrosse balls, soft tissue sticks, etc., but whatever you can get your hands on will help.

First, become aware of any sore, tight or uncomfortable spots on your body. Next, pinpoint those with a massage. With the massage, you are looking to relax the spot, not irritate it. So, be strategic with your approach. You should be able to breathe through the pressure without it feeling so intense that you hold your breath. Spend about 30-45 seconds scanning your body massaging, looking for noticeable spots. Once you find the spot, spend about 10 seconds melting into that spot, hoping for a release of tension. Click here for more info on how to use a foam rolling for self massage.

#2 - Stretch

Giving yourself a massage can provide wonders to your relaxation, but it may not always solve the problem. This problem could be arising from chronically tight muscles or overuse from exercise/physical activity. Self-massage can help to relax these areas but providing an additional stretch to that area can really help to give your body the best chance at relieving the discomfort long-term. Long term relief is what we are looking for especially since we will be sleeping anywhere from 6-9 hours at night. 

First, take note of the noticeable spots that you self-massage. Next, apply specific static stretches to those muscle groups to provide a longer-lasting stretch relief. For static stretching, you are looking to hold the stretch at a manageable tension (still being able to relax and breathe) for 45-60 seconds, or until you feel the muscle release. Don’t know where to start? Click here for a 7-minute stretch sequence you can do everyday. There is a noticeable release in tension, or more noticeable, an increase in flexibility around the 45 second mark, give or take. We recommend reaching that point of release and then holding the new range of motion for an additional 10 seconds or so, totaling 45-60 seconds per stretch.


#3 - Minimize Blue Light

Blue light has been given a bad rap in recent years due to its effects on your body’s natural circadian rhythm. So, let’s backtrack for a second and define blue light. Blue light is one of the light wavelengths that come from electronics like TVs, phones, laptops, bathroom lights, etc. These blue lights are beneficial during the daytime due to their ability to boost attention, reaction time and mood/energy. Given that, these may not be the attributes we are looking for as we are trying to go to sleep - hence the problem. Studies show that the blue light suppresses your melatonin and also shifts your natural circadian rhythm from 1.5-3 hours.

The goal isn’t to remove blue light completely from your life but to remove it when it’s no longer beneficial to your daily routine. So, first try and remove blue light 2-3 hours before bedtime. Lastly, if you are unfortunately strapped to your work before bed, look into purchasing some blue light blocking glasses. Yes, they may seem silly to your spouse and kids, but they will really help with your sleep life.


#4 - Read a Book

Are you feeling overworked nowadays with the demands of our work, personal life, health, etc.? It’s hard to find times to wind down after a long, exhausting day. As we learned earlier, watching tv prior to bed may not be the best route to wind down if you have trouble falling asleep. One route to go is reading a book. The constant, repetitive movement of your eyes can help to tire them out. Reading also helps to take your mind off past and future things that are running through your mind and keeping you in fight or flight, sympathetic response. A good book can help you escape from the world for a bit, calm your mind and help prepare you to fall asleep naturally and comfortably. Just don’t find that book that’s too good to put down, haha!


#5 - Avoid Late-night Snacking

According to a recent study, eating later in the evening is linked to sleep disruptions. Particularly, women seem to be more vulnerable than men to these effects. So, be cautious ladies. The later you eat in the evening, closer to bedtime, the more prone you are to having poor consequences on your sleep that night. Also, higher fat consumption during those meals/snacks also seems to create more sleep disturbances in both men and women. The difference for women came with higher caloric consumption that linked to greater sleep disturbances compared to men. Take in this knowledge and do some trial and error, self-assessment on your meal/snack timing and your sleep quality/quantity.

7 Exercises to Increase Stability and Mobility In Your Ball and Socket Joints

Recovery can come in many forms: from passive recovery to active recovery, and to nutrition to just plain ol’ sleep. Today, I will demonstrate some active recovery techniques in the form of corrective exercises that work towards keeping the ball and socket joints healthy via mobility and stability exercises.

What is a ball and socket joint? Well, it is a joint in which a ball moves within a socket to allow rotary motion in every direction within certain limitations. The shoulder and hip are both ball and socket joints. Without these types of joints, we would not be able to run around and be agile or reach for things in all directions. 

However, with lots of range of motion, comes an increased risk for POTENTIAL of injury. Injuries happen in a number or ways, from freak accidents, to pushing past your strength limits and many others. But, aches and injuries can also come from a lack of the proper mobility and stability in those joints. This can often happen from living a sedentary lifestyle which leads to neglected movement patterns that utilize the full capabilities of these ball and socket joints. Also, staying in chronic positions, such as sitting in a computer chair, can lead to compensations that will then limit your range of motion in those joints.

Mobility and stability are some terms that can be difficult to understand and picture mentally in regards to which exercise accomplishes which of the terms. Let’s simplify it by looking at stability first. The root word is stable, which should tell us we want it to be secure and not moving around much, if any at all. For example, holding a weight over your head is an exercise requiring proper shoulder stability so the weight does not fall forward, backward or sideways. Similarly for the hip, balancing on one leg, bent over, like a ballerina, is an exercise where you would want proper stability. This way you won’t fall over and you can hold steady. 

Mobility on the other hand is where it can be a bit tricky. The word mobility gets tossed around often synonymously with the word flexibility. However, there is a difference. Let me explain - flexibility is simply how far a muscle can stretch or how much a joint can move. For example, if I were lying on my back with my legs straight and lying on the floor as well, I could demonstrate the difference between mobility and flexibility for you first. If I had a trainer lift my left leg for me and push it towards my head, with my knee locked out straight, I would feel a stretch in my hamstring. However far the trainer can lift my leg will demonstrate my flexibility - that’s because this was a passive stretch, and I was completely relaxed. Mobility, on the other hand, would be if I actively lifted my left leg by myself, without using my arms or any other assistance. Mobility requires the opposing muscles to fire, to stretch the muscle you are targeting. Typically, you will have more range of motion with flexibility, compared to your mobility. The problem arises when there is a dramatic difference, because walking, running, exercise, etc. all require mobility, not just flexibility. When there is a significant lack of mobility, this is where unexpected aches and injuries happen. 

So, with that being said, let us explore some mobility and stability exercises that will help to put the shoulders and hips into positions that will help to keep those joints moving the way they were intended to and keep you safe and strong! Implement these on an as-needed basis, as a mini-workout or utilize them as a dynamic warm-up for a workout.

Shoulders: 2-3 sets; 1-3 times per week

  1. Swimmers- Prone (mobility)- 5 both directions

  2. Front High Plank- Hold (stability)- :30-1:00

  3. Side High Plank- Hold (stability)- :30-1:00

  4. Walking Overhead Carry- DB (stability)- 25-50 yards per arm

Hips: 2-3 sets; 1-3 times per week

  1. Hip CAR (mobility)- 5 per leg

  2. T-hip Rotation (mobility/stability)- 5 side to side per leg

  3. Mini Lateral Bound to Stick (stability)- 5 per leg

6 Steps to Cool Off Your Burnout From Exercise

What is burnout from exercise?

Burnout isn’t always just one variable but oftentimes an accumulation of many. Burnout symptoms can resemble general fatigue, abnormal intra-workout fatigue, low motivation and a dip in your progress related to your performance.

How do I combat burnout symptoms?

1. Listen to your body. Take time off.

Sometimes our best data is built right into our human bodies. Of course, heart rate variability and recovery goals are great indicators to determine your current performance level capabilities, but our bodies will often let us know when it’s time to rest.

Simply put, the several burnout symptoms mentioned above are great variables that will let you know it’s time to take a break, but some of those are a bit too far down the rabbit hole of overtraining and burnout by the time we notice them. 

If you have been training consistently for weeks to months and you’re noticing your performance is stagnant or you aren’t able to hit the weights you did in the past, take that as a sign to take a day or two off. Allow your nervous system and tissues to fully regenerate. You’ll soon realize that was the missing piece all along to achieving your personal best!

2. Prioritize recovery, quality sleep and rest days.

As proactive high-performers, we can often get too obsessed with hard-work and tend to overlook or completely neglect the recovery side of life. One thing to always remind yourself is Stress + Recovery = Adaptation. Or simply put, Work + Rest = Success. 

Imagine having a viral infection in your body and continuing to work 12 hour days, plus continue to touch random objects in public while touching your face and mouth, never taking any medication, eating a poor diet and then getting 4 hours of sleep. Odds are, you’re probably going to feel miserable and stay sick a long time. Now treat exercising like the infection and your recovery like the medicine and rest.

The key to it all is learning to understand your unique body’s amount of exercise stress it can take and how much proactive recovery it needs on a weekly basis. This is best done through simple trial and error.

One good starting point is to train no more than 2 days in a row and aim to get 7-9 hours of quality sleep per night. If you can tackle those 2 key recovery variables consistently, then you will have laid a great foundation for being able to exercise harder and more often.

3. Change up your programming/goals to reduce boredom.

If fitness has become a lifestyle for you, or you are just beginning a new journey, it’s possible you will focus on one particular goal for months on end. This isn’t a bad thing! It’s good to set realistic goals and seek to achieve them by any means.

However, doing the same routine for months or even weeks on end can lead to a plateau effect along with demotivation from boredom of doing the same thing constantly. Seek to change the exercise selection within your routines to provide a new mental stimulus and focus.

If you have been training towards building size on a particular muscle group or strength on a particular lift, maybe take a month off and focus on a new goal that is in a similar realm.

4. Wear a heart rate monitor to avoid overexertion and give you motivation.

Knowing what your true potential is and knowing if you are working too hard can be two difficult things to pinpoint during your workouts without some specific data and tech. This is where heart rate monitors come into play.

A heart rate monitor tracks how many beats per minute your heart is working at, while also placing your current heart rate into a “training zone” based on your current age. Your training zone can be anywhere from Zone 1-5. Zone 1 is a lower heart rate zone from 50-70% of your max HR, while zone 5 is a higher heart rate zone from 90-100% of your max HR. Your heart rate zone is based off of the formula for your max heart rate which is 220-your age. 

Using heart rate zones for specific goals or outcomes for your workouts can help to keep you accountable during the workout and also prevent you from accidentally over-training during the workout.

5. Add a variety of exercise, not just strength training or just cardio.

If you are new to exercise or have been doing it a while with your own guidance, odds are you have been doing the same routines for months or even years. This can lead to plateaus, decreases in performance and also boredom.

Adding a new variety of physical activity or exercise can be just what the doctor ordered! Think about other forms of structured exercise such as group exercise classes, goal-driven strength or cardio programs, personal training, recreational sports, hiking, etc.

These new forms of physical activity will put your body into new ranges of motion, challenge new energy systems and create a sense of fun for exercise.

6. Add varying intensities and volume. You can’t expect to train at 100% 4-6 days per week. 

Have you ever heard the phrase “Go hard or go home!”? How about “No pain, no gain!”? These old-school phrases are driven off of motivation techniques for athletes to train at their potential on days when they are feeling low energy and unmotivated. These phrases are not realistic daily approaches to exercise.

In fact, trying to train at 100% intensity of your potential every single time you step foot in the gym will actually lead to a decrease in performance (strength, size, endurance). Crazy to think, right? This is because the body recovers at different paces based on how intense and long the workout was. If you are expecting to go 100% 4-6 days per week, you won’t have enough recovery time by the time you get to day 4 or 6 to reproduce the same outcomes.

Instead, try changing up your intensities (e.g., load, speed of movement) and volume (e.g., reps, sets, length of workout) on a weekly or even daily basis. Having this undulating programming will allow the body to get some recovery time even while you are working out on other days. Instead of 100% for 4-6 days, you may have 1-2 days of 100%, 1-2 days of 75% and 1-2 days of 80%.

Heat & Cold Therapy for Recovery

Have you ever been really sore a couple days after a really hard workout?  Was it difficult to get motivated to push through another intense workout session?  This soreness is likely the result of muscle fatigue usually due to lack of recovery time and proper recovery techniques.

D.O.M.S. (delayed onset muscle soreness) usually occurs 24-48 hours after a workout.  Proper rest, hydration, and recovery, can help you beat D.O.M.S.  Let’s take a look into one recovery technique, cold and hot therapy. There are benefits of using each technique separately or together.

COLD THERAPY

Cold therapy helps by reducing blood flow to a particular area. This reduction of blood flow can significantly reduce inflammation and swelling around your joints and tendons. Cold therapy can also help with pain relief of the muscle.  You want to use cold therapy for about 10-15 minutes several times throughout the day.  You should not go any longer than 20 minutes during one sitting.  Below are some suggestions on different cold therapy options.

  • Ice pack or gel pack

  • Ice massage

  • Ice baths

  • Coolant sprays

  • Whole body therapy chambers

Do not put ice directly on the skin and do not use cold therapy on stiff or tight muscles and joints.

HEAT THERAPY

Heat therapy helps by improving circulation and blood flow to a particular area. By increasing the temperature when using heat this can soothe discomfort and increase muscle flexibility.  While using heat therapy the muscle can become more relaxed and help with tissue damage.  Heat therapy can be applied for a longer period of time ranging from 20 minutes to 1 hour depending on the type of heat therapy used.  Below are some different types of heat therapy.

  • Dry/Wet Heating Pads

  • Hot stone massages

  • Hot Bath w/ Epsom salt

  • Hot Shower

  • In house steam room (Place a rolled up towel under draft space on door and turn shower on high heat)

Do not use heat therapy on swollen or bruised areas or open wounds.  There are certain pre-existing risk factors that may cause complications when using heat therapy.  Please contact your physician if you have questions on this.

Take the time out of your day to try one of these techniques or combine the two to help maximize your recovery time.  Making sure to hydrate and getting proper sleep are also contributors to a healthy recovery.  For additional info on good recovery habits, check out Gavin’s blog on foam rolling and stretching. For questions please email gbarrilleaux@teamexos.com.